What is BIOS
First before we update BIOS lets define what BIOS is. Bios is the Basic Input Output System. Basically it is the firmware or software that is embedded on the motherboard of your computer. To be more specific the BIOS firmware is stored on the CMOS which is a small chip on the motherboard.
When you turn on your computer, the BIOS activates the hardware and enables the interaction of the operating system and the hardware and hardware.
The BIOS stores the information about your boot devices, boot sequence whether you are booting from the harddrive, network or flash drive. The BIOS is also responsible when you configure hardware such as hardrive, CPU and ram and any connected devices.
BIOS, CMOS and NVRAM difference
Before we go into how to update your BIOS, I want to clarify other common and confusing acronyms. The acronyms BIOS, CMOS and NVRAM, they are often used interchangeable to mean the same thing while they are different.
We have already defined BIOS, now CMOS which means Complementary Metal Oxide Semiconductor is the chip where the BIOS and its settings are stored. The NVRAM is an acronym for Non-Volatile Random Access Memory is memory where extended system configuration data is stored.
Updating your BIOS
Why dou need to update your BIOS? Unlike other software the BIOS update is not automatic. You have to update it manually. Updating your BIOS can help fix a number of issues for example when Dell issued a BIOS update in this Gizmodo story and other issues like laptop battery problems.
How to update dell BIOS
You first need to check which version of the BIOS your computer is running, in that way you can see if there is a newer version available for your model. Also note installing the wrong BIOS firmware can cause your Operating System to not function.
How to check BIOS version
If you are using windows 10, you can easily get the BIOS version. Type msinfo32 in search then the enter or return key. Windows will bring up the system information and your BIOS information and version will be shown as on the screen shot below.
If you are using windows 8 or 8.1 to check your check your BIOS version, right click on start button and select run. Alternatively press the windows key on your keyboard and R you should get the run box. Then type msinfo32 and press the return or enter key and the system information window will pop up
If you still can’t get the information, you can use command prompt. This will also work on any windows computer. In command prompt enter the same command as above which is “msinfo32” and you should get the information as in the Dell Inspiron screen shot below.

How to get BIOS info from command prompt
- Click start and search for run and press enter. Alternatively press windows and R key on the keyboard
- Then type cmd and press OK or the return key.
- Enter the following command “Systeminfo” without the quotes.
- The command prompt will load a bunch of information on about you system such as whether its XPS, Inspiron, alienware you hardware and computer status, it will auto scroll down.
- When its done just scroll back to the top until you see the information on the screen short below.
- You will find your BIOS information as shown below.
Download Dell BIOS
The next thing you will need to update the BIOS is download the firmware. You will download from the dell website. I recommend downloading from the manufacturers website which is the safe way. You can down your BIOS from other website but i don’t recommend it, since there may not be as reliable.
- Go to Dell.com
- Click on support and drivers
- Enter your service tag to identify your computer. This is important, so you download the correct firmware. If you don’t have the service tag this article goes in depth on how to find it.
- After identifying the computer select your operating system.
- Under drivers click on BIOS
- Check the version and download the .exe file.
Another option would be to go on this page http://downloads.dell.com/published/Pages/index.html were all dell drivers are listed and scroll or search for your computer.
An important thing to note is that in order to update the BIOS successfully you need to have the battery and power adapter connected if it’s a laptop. If you have battery issues check the the how to update BIOS without battery section towards the end of the article.
Updating BIOS using windows system
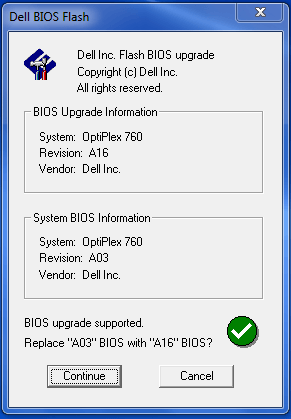
Now that we have the firmware the rest is easy. Double click the executable file. It will open a window with details about the new BIOS firmware you downloaded. It will show ou the different BIOS version for example replace “A11” BIOS with “A12” BIOS or something like that depending on the version of your BIOS click continue.
How to update your computer BIOS from flash drive
NB Note the exact name of the exe file before you shut down the machine in the following steps as you will need it later on in the process
- Format the flash drive
- Copy the BIOS executable file that you downloaded in the steps above to the flash drive.
- Shutdown the computer and insert the flash drive containing the BIOS.
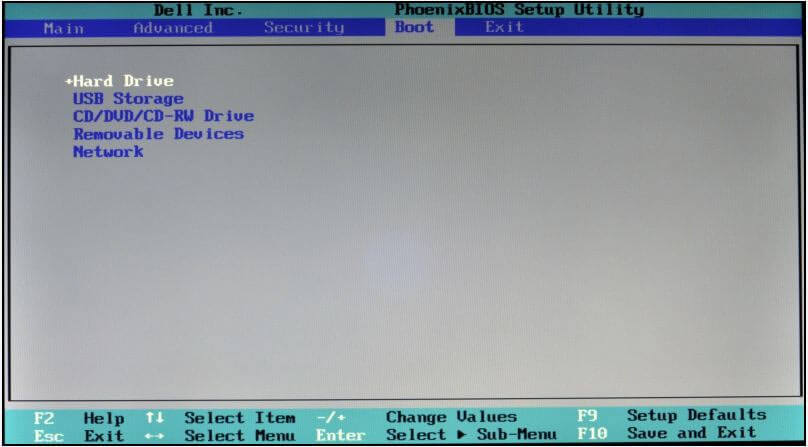
- Power up the computer and immediately press F12 on the Dell splash screen
- You will be using the keyboard to navigate, use the arrows to select USB storage device then press enter.
- The system should boot from the flash and then give a prompt on Diag C:\>
- Now type the exact name of the file and the extension eg O9010A09.exe and press enter
Now you should get ” this utility will update the system BIOS press Y/N to continue”
Press Y and enter to update
How to update system BIOS on Linux
If you are using Ubuntu 16.04 or later the system will automatically notify you if there is a system update. For Ubuntu systems before 16.04 you will need to manually update the system BIOS.
To update Ubuntu system BIOS using USB
- You need to format you flash drive to fat32
- Plug in the the USB flash drive.
- Click on the Ubuntu icon
- Type disks
- Click on disks
- Identify and select your flash drive on the drives that appear on your right
- Check if it reads as FAT32 or not if not Click the gear icon and select format, select FAT32 as filesystem
Now download and copy the executable BIOS file from Dell in the same steps mentioned above for the windows system. Now reboot the computer and interrupt the boot process by selecting F12 and navigation to the USB flash. Even though executable files don’t run natively on linux the executable BIOS file will be successful run at this period.
This method works on Dell computers which had Linux preinstalled for example the XPS 13 linux version.
Update BIOS without battery on laptop
As already mentioned in order to update BIOS the system forces you to have the battery charged and adapter connected. But you can override this if you have battery issues or problems with the adapter.
Please make sure you have a sufficient and reliable supply of power from either your laptop battery or from the adapter. This is important because if the computer loses power in the middle of an BIOS update it can spell doom to your computer or cause you more issues.
To override the adapter and battery requirement and update BIOS without battery or power connected you
- download the BIOS firmware as instructed above.
- Save the firmware in an easily accessible location on your hard drive for example on the root in C:
- Run command prompt as an administrator
- Type cd\ and enter to return to root menu or type C: and enter
- Type this command exactly A6540A09.exe /forceit and the press enter. Change the characters before exe to the name of the file you downloaded
- Type Y on the prompt and your update should do without the battery
Password prompt when trying to update BIOS
If you encounter problems with either Windows, BIOS or Hard drive passwords when updating passwords here is how to solve them.
Windows passwords
You can still update BIOS system without the windows password using the USB method above. Just download the firmware and follow the instructions outlined above on updating BIOS using USB.
BIOS and Harddisk passwords
When you do not have the Hard drive or BIOS password you will get a variation of the following messages, “Enter HDD password” “Harddisk Security SATA Port 0 Lock” “Enter System Password”. In that case you will need to contact dell to get the Master Password. Then you can clear the password. When contacting Dell, you will need to provide proof of ownership of the computer. Have your service tag ready as you will be asked for it.
The Master passwords are case sensitive so when you get the master password check you caps lock if you get the password invalid message. If the password still doesn’t go through, try the same password three times and you should be able to clear the BIOS or Hard drive password.
For more questions and scenarios leave comments below and i will be happy to help.
Thanks for sharing. I read many of your blog posts, cool, your blog is very good.
Thank you for your sharing. I am worried that I lack creative ideas. It is your article that makes me full of hope. Thank you. But, I have a question, can you help me?
Your point of view caught my eye and was very interesting. Thanks. I have a question for you.
Thanks for sharing. I read many of your blog posts, cool, your blog is very good.
Your point of view caught my eye and was very interesting. Thanks. I have a question for you.
I don’t think the title of your article matches the content lol. Just kidding, mainly because I had some doubts after reading the article.
Can you be more specific about the content of your article? After reading it, I still have some doubts. Hope you can help me.
I don’t think the title of your article matches the content lol. Just kidding, mainly because I had some doubts after reading the article.
Thank you for your sharing. I am worried that I lack creative ideas. It is your article that makes me full of hope. Thank you. But, I have a question, can you help me?
Can you be more specific about the content of your article? After reading it, I still have some doubts. Hope you can help me.
I don’t think the title of your article matches the content lol. Just kidding, mainly because I had some doubts after reading the article.
Can you be more specific about the content of your article? After reading it, I still have some doubts. Hope you can help me.
Your point of view caught my eye and was very interesting. Thanks. I have a question for you.
Your point of view caught my eye and was very interesting. Thanks. I have a question for you.
I don’t think the title of your article matches the content lol. Just kidding, mainly because I had some doubts after reading the article.
I don’t think the title of your article matches the content lol. Just kidding, mainly because I had some doubts after reading the article.
Thanks for sharing. I read many of your blog posts, cool, your blog is very good.
Thanks for sharing. I read many of your blog posts, cool, your blog is very good.
I don’t think the title of your article matches the content lol. Just kidding, mainly because I had some doubts after reading the article.
I don’t think the title of your article matches the content lol. Just kidding, mainly because I had some doubts after reading the article.
Your point of view caught my eye and was very interesting. Thanks. I have a question for you.
Reading your article helped me a lot and I agree with you. But I still have some doubts, can you clarify for me? I’ll keep an eye out for your answers.
Your article helped me a lot, is there any more related content? Thanks!
Your article helped me a lot, is there any more related content? Thanks!