
We recently wrote an article on how to screenshot on dell computer.
What if you want to do a screen recording on your dell computer.
Well that’s easy too.
Not much technically expertise required.
We going to cover multiple methods to record your dell laptop or desktop screen.
You don’t need to install any software for using this method. Well at least for the first 2 methods.
First we will use the Windows 10 game recording feature.

This will allow us to record screen. Works weather you playing a game, recording your browser or even creating a tutorial.
- To begin recording press the windows Key + G on your computer
- A small window will appear on the center of your screen with the title of the currently active window and settings
- Press the center button to start recording the video
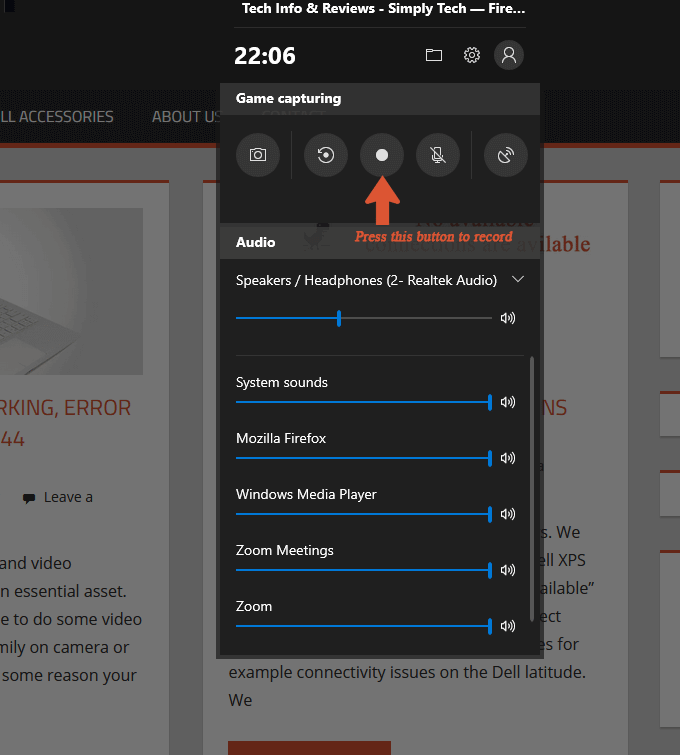
A couple of things to note, you can change a lot of the settings for example if you want to record audio you can enable the microphone which will be disabled by default.
You can adjust the volume of other applications that you have open. On the image above I have the browser open, zoom and Windows media player running. You can adjust the volumes of the various media as show in the image above.
The recorded video size will match the screen resolution, This means the size of the video can become big very fast depending on the resolution of your screen. If you have high resolution for example 1920 x 1080 or larger within a few minutes you will have more a gigabyte video.
Videos will be saved in the My Videos folder when you stop recording.
PowerPoint screen recording
The second method also does not require you to install any software but you need have Microsoft Office’s PowerPoint on your dell computer to use fr screen recording.
To begin recording the screen
Start PowerPoint, Create a blank slide then Go to an insert, then on the far right side of your screen screen recoding button button will appear. Click Screen recording as in the image below.

A small window with 4 buttons will appear like the one below will appear.
Click the first Button which says record, you can select a portion of the screen or the entire screen to record

The bar disappears after a while to get it back hover over the top center of the screen and it will reappear and you can stop or pause the recording
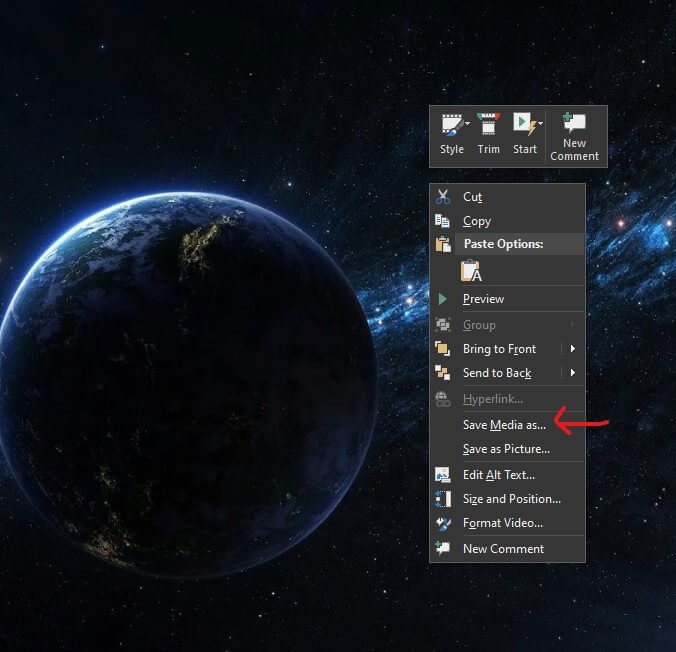
Once you stop the screen recording the video will automatically be saved inside the slide. Now you can save it on your computer as its own file in an MP4 format.
Right Click on the video and select save media as. Browse too where you want to save the video and type the filename. Click Save
You can edit your video using a video editor of your choice an external video of your choice. Also note that PowerPoint offers options to edit your video too life increase brightness which can be helpful if you don’t want to pull out your fully fledged video editor
OBS screen capture
Now for some robust rich feature screen recording you can download and install OBS. Open Broadcast Software is open source, you can download it for free from here.
After downloading has finished double click the file to begin installing. Follow the wizard to install.
OBS is fully fledged streaming and screen recording software hence it has a lot of features
The learning curve is not that steep either especially for the basics.
We won’t go into much depth on OBS screen recorder, we will just get you started on recording the screen
After OBS has been installed.
Start the software and click add sources as in the pointed arrow below

After clicking the plus sign, select display capture.
On the small pop window tick make source is visible and click ok.
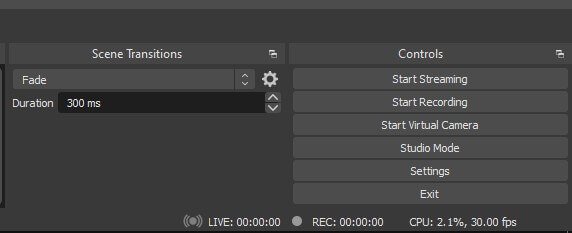
On the bottom right of the screen you will see the options to start streaming, start recording, start virtual camera.
Select start recording. Now go and do what you want to record on the screen. OBS will be recording the whole screen in the background.
Also note audio will also be recording, you can mute audio recording on the audio mixer if you don’t want the audio.
When done go back to OBS and stop the screen recording.
Your video will automatically be saved in my videos folder unless you have changed the default folder to save to.
You can record portions of your screen, record and mix multiple sources various qualities and so on.
Poke around the setting most of it is really intuitive. Some setting might be resources intensive on you dell computer.
that record is simple but in my laptop it says it doesn’t support it
Hey, I’m Christine and I’m currently studying as an ABM student. I use my computer (Dell) for my online study and I used to worry a lot about my storage space since we do have a lot of activities in forms of documents and videos. Until recently, I discovered this Acethinker Free Online Screen Recorder and I was just so amazed since it doesn’t need to be installed to be used. I only have to bookmarked it and visit the link whenever I want to record online learning sessions to re-watch it when I feel like I want to.
For a beginner vlogger like me, free tools are the only tools that I can use since I can’t afford to buy expensive software. Recently, I am using OBS but having a hard time to configure its settings. Good thing that online tools like “record-screen.com” exist, I use it as an alternative. But I followed your tips and it work! Thanks.
Thank you for your sharing. I am worried that I lack creative ideas. It is your article that makes me full of hope. Thank you. But, I have a question, can you help me?
Can you be more specific about the content of your article? After reading it, I still have some doubts. Hope you can help me.
Can you be more specific about the content of your article? After reading it, I still have some doubts. Hope you can help me.
Can you be more specific about the content of your article? After reading it, I still have some doubts. Hope you can help me.
I believe that avoiding packaged foods will be the first step to lose weight. They will taste excellent, but highly processed foods possess very little vitamins and minerals, making you take in more simply to have enough vigor to get throughout the day. Should you be constantly having these foods, moving over to whole grains and other complex carbohydrates will aid you to have more electricity while having less. Interesting blog post. Nathan Tonge
Thanks for sharing. I read many of your blog posts, cool, your blog is very good.
I don’t think the title of your article matches the content lol. Just kidding, mainly because I had some doubts after reading the article.
Can you be more specific about the content of your article? After reading it, I still have some doubts. Hope you can help me.
lankyr
Your point of view caught my eye and was very interesting. Thanks. I have a question for you.
6yc8ko
Can you be more specific about the content of your article? After reading it, I still have some doubts. Hope you can help me.
Thanks for sharing. I read many of your blog posts, cool, your blog is very good.
I don’t think the title of your article matches the content lol. Just kidding, mainly because I had some doubts after reading the article.
I don’t think the title of your article matches the content lol. Just kidding, mainly because I had some doubts after reading the article.
Thanks for sharing. I read many of your blog posts, cool, your blog is very good.
Your article helped me a lot, is there any more related content? Thanks!
Your point of view caught my eye and was very interesting. Thanks. I have a question for you.
I don’t think the title of your article matches the content lol. Just kidding, mainly because I had some doubts after reading the article.