A lot of the Dell 2 in 1 laptops come with screen auto rotation function enabled by default. The feature is available across most dell models , dell inspiron, latitude and XPS computers.
The auto rotate feature is very useful especially if you have a computer you can flip 180 degrees. You don’t want to be always repeatedly manually rotating the screen.
Unfortunately it glitches or does not work as desired.
If you go through the tech forums you will realize that its a common issue. Fortunately there is an easy solution available.
We are going to cover multiple methods of fixing the dell auto rotation issue.

Fix dell accidental auto rotate issue
Why is my Dell laptop screen upside down you ask yourself and you don’t know how you rotated it, don’t worry it happens
First, lets fix the problem if you changed the rotation by mistake. You can easily undo the rotation. If you mistakenly rotated your screen you probably used the hotkeys CTRL + ALT + Arrow keys.
Use the same hotkeys to change it back
Use Hotkeys
To change the screen rotation back to normal using the hotkeys.
Simultaneously press any of the below .
- Ctrl + Alt + Right Arrow
- Ctrl + Alt + Down Arrow
- Ctrl + Alt + Left Arrow
- Ctrl + Alt + Up Arrow
The screen will rotate to the direction of the pressed arrow key. If this method is not working on your computer read on the other solutions below
Please not, the hot keys can also be disabled if you don’t want them active.
To disable the hotkeys minimize or close everything on you computer > go to your desktop > Right-click on the desktop> click Properties > In the Display Properties window, click the Settings tab. > Click the Advanced button. > Click the Intel® Graphics Technology tab to access the Settings page. > Click the Hot Keys page and
disable or enable the hot keys.
Display settings
The next option is to change from the display settings on your computer. You can use use you mouse or keyboard to navigate. Since the screen is rotated the mouse movements also change. Note that you will need to orient yourself to the new mouse movements since it will be different to what you are used to.
Move the mouse around to get a feel of how it moves now.
Its much easier if your device is touch enabled
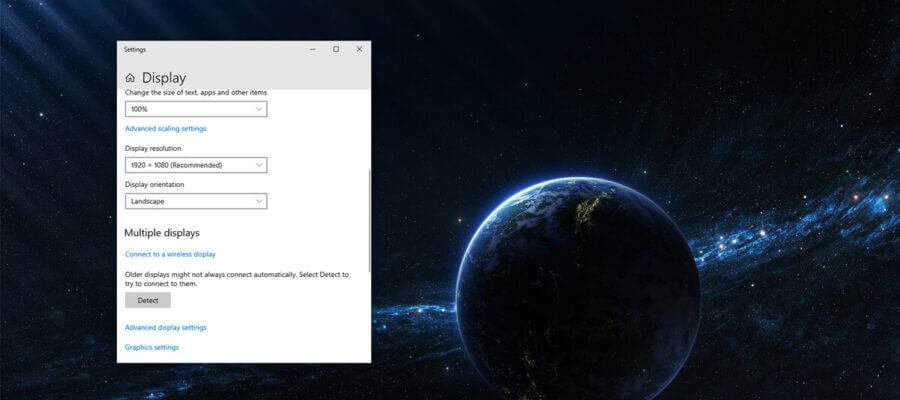
- Right click on the display
- Select Display settings
- Then display orientation
- Change it back to landscape
- Click keep settings to apply the change
How do I stop my dell from auto rotating
Now, if you want to completely stop the computer from auto rotating the screen there are multiple ways of doing it. First option is disabling auto rotate from the graphics setting of your computer, the other option is using windows settings.
Use windows to prevent your computer from rotating the screen
You can disable using windows settings
In windows 10 go to settings, then click on the display tab, change it from whatever it is to landscape. Next uncheck the box that says allow the screen to auto rotate. You should be good to go.
Disable auto rotate from Graphics settings
You can disable auto rotate feature of your device from the graphics settings.
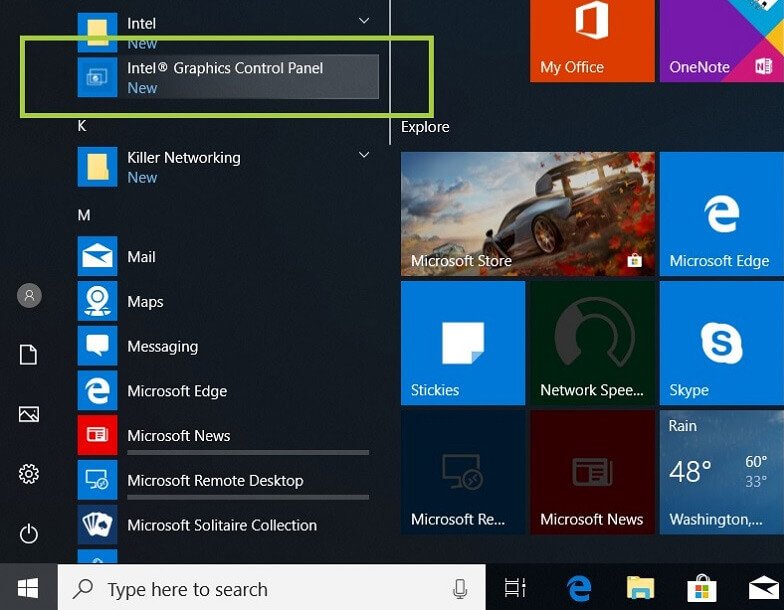
- Right click on the desktop of your computer
- Click graphic options
- Select Intel Graphics settings
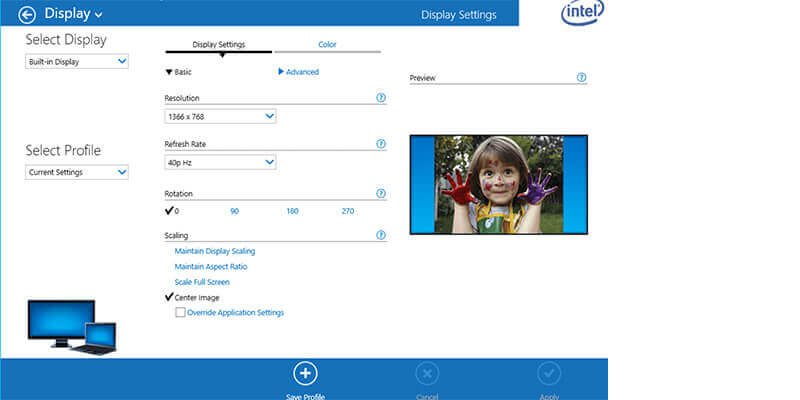
- On the intel Graphics settings page select Display
- Then on rotation click on 0 as in the image below, the other options 90 degrees 180 degrees will rotate the screens according to those degrees.
- Click on save and apply.
This should disable rotation on computer

Auto rotate not working fix
On the other hand you might have the problem of the feature not working at all, first check if your device has the hardware for auto rotation. If you are sure your device supports auto rotate but its not working you can troubleshoot by first installing or re installing the graphics drivers.
To download the correct drivers you will need to know your dell service tag read on the link to find out how get the service tag. Alternatively you can identify your computer model as covered in this article.
Go to the dell website, select drivers and support. Make sure your computer is correctly identified.
Select the operating system you are using, windows 10, 8 or windows 7.
On the listed drivers look for Graphics drivers an example like Intel(R) HD 520 Graphics.
Install the drivers and check if it fixes auto rotation on your device.
If the drivers were already installed you can uninstall and reinstall them again.
Intel Integrated Sensor Solution Driver
Some of the dell 2 in 1s had issues with the sensor , in addition to installing the normally graphics driver you have to install the Intel Integrated Sensor solution.
The following latitudes, Latitude 3189, Latitude 5285 2-in-1, Latitude 5289 2-in-, Latitude 7285 2-in-, Latitude 7389 2-in-1 are the ones affected.
You can download the driver here from mediafire last updated Jan 2020
After installing the driver the rotation sensor performance will be improved
Also note that some users reported using the Intel integrated sensor solution drivers on their XPS laptops and it fixed them.
Enable auto rotate in windows.
If its not working also make sure you check on windows settings described above if in the checkbox allow rotation is enabled. At times you might have been disabled and you just need to enable it again.
On some inspiron laptops the rotation lock is greyed out, trying switching from between tablet and normal mode to see if the rotation checkbox can be enabled and disabled.
Device Manager
Last check device manager to see if all the drivers are installed, especially the sensors drivers. Disable and enable them and check of they are functioning properly.
For driver with question marks or yellow warning signs update the drivers.
Conclusion
Since there is a variety of models, operating system versions solutions will vary. If you find a method that works for you that we did not include above let us know in the comments section. It will help the next person


Can you be more specific about the content of your article? After reading it, I still have some doubts. Hope you can help me.
Your article helped me a lot, is there any more related content? Thanks!
Your point of view caught my eye and was very interesting. Thanks. I have a question for you.
Thank you for your sharing. I am worried that I lack creative ideas. It is your article that makes me full of hope. Thank you. But, I have a question, can you help me?
Thanks for sharing. I read many of your blog posts, cool, your blog is very good.
Thank you for your sharing. I am worried that I lack creative ideas. It is your article that makes me full of hope. Thank you. But, I have a question, can you help me?
I don’t think the title of your article matches the content lol. Just kidding, mainly because I had some doubts after reading the article.
Thanks for sharing. I read many of your blog posts, cool, your blog is very good.
Your point of view caught my eye and was very interesting. Thanks. I have a question for you.
Thank you for your sharing. I am worried that I lack creative ideas. It is your article that makes me full of hope. Thank you. But, I have a question, can you help me?