Frustrated that your computer won’t turn on all of a sudden?
Well, you are not the only one. We have written a number of guides on how to fix various models of computers that wont turn on.
Unfortunately it seems the issue is so frequent that we still keep getting the same questions, why is my computer not turning on, my computer failed to start and so on, with other variations of the same questions.
We have decided to create one mega article to address the various issues that may cause your PC to fail to turn on. This article will not focus on a specific brand like our previous articles. So it wont matter much if your computer is a Dell, HP; Asus, Gateway since most of the issues can be solved with the same methods. Were a function is only available on a specific model or brand it will be specified.
To avoiding wasting your time through reading the whole article because its long, use the menu below to click and jump to the seemingly most appropriate scenario causing you computer not to turn on.
- Remove flea power
- Power Source and Cables
- Laptop Battery
- Video Cables
- Peripherals /Accessories
- Power Supply and Cables
- Real Time Clock Reset
- Graphic Card / GPU
- Power Supply Unit
- Clear CMOS
- Monitors and Display Units
- Motherboard
The sections are arranged from the easiest to perform to the advanced solutions.
Remove flea power.
This should be your first attempt, many people have reported success using this method. Basically what happens is that the computer motherboard can store electricity even when your computer is switched off and disconnected from the power supply. This residual electricity can interfere with your PC turning on. Hence you need to drain the flea power.
To drain flea power on laptop:
-
- Disconnect the laptop from the power supply.
- Remove the battery (you will need to consult you laptop manual if your battery is not easily removable).
- After removing the battery press and hold the power button for about 20 seconds.
- This clears the flea power, now connect the laptop to the power supply.
- Then turn it on.

Note: If you fail to remove the battery or you have sealed in batteries like on the Asus K55 or Dell 7535, you can disconnect the power then try step 3 with the battery still in it. This can still fix the computer that won’t start. You can read more about that on the RTC section.
Remove flea power on desktops.
If you have been fixing computers for some time you probably have noticed this. If you disconnect the desktop computer from the power supply, the green or blue light (depending on make) on the motherboard takes time to completely go off.
Also if you press the power button even without the power connected, the fans can spin for a bit then switch off without the computer turning on. This is because of the flea power.
Now to clear the residual power you follow the same process as with the laptop. Disconnect power, press and hold power button for about 20 seconds. Then connect the power back and try and see if it still wont turn on.
Next on the elimination process
Check Power supply and cables
This is just so we can get this out of the way. Check your power source by plugging on a different outlet or plugging in a different gadget on the same power source to see if it works.
On most computers, if its receiving power it should show lights, or have them blink when you press the power button.
Laptops
On laptops check the charger if its working, they also usually have a light indicating whether a current is going through it as in the picture below.
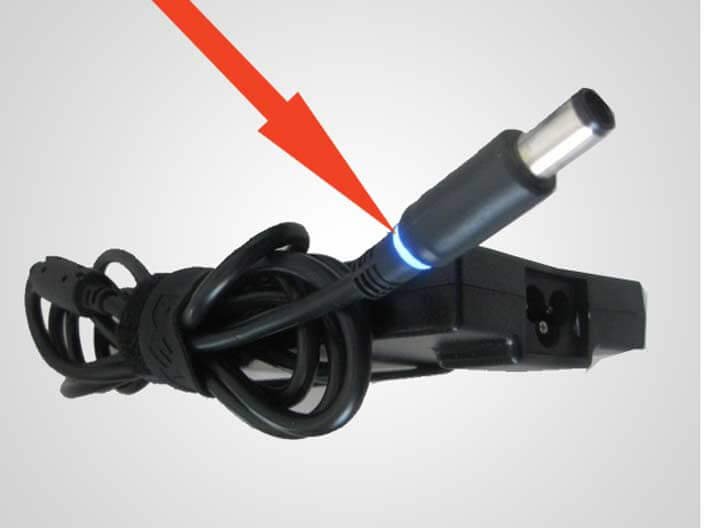
Also check on the laptop itself for example on HP laptops if power is being transmitted to the laptop. There is a light, usually next to the charging port which turns orange when its charging. If the battery is full the light changes to white. The colors of the lights also differ depending on brand and model like Asus, compaq and so on.
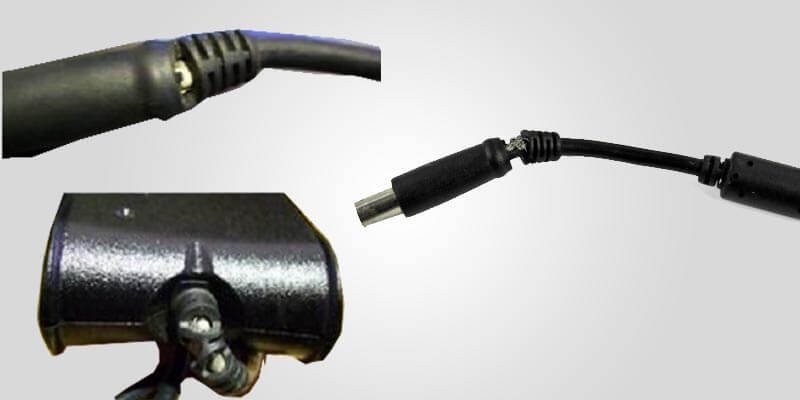
If your charger is deformed, chipped or shows some sort of anomaly like the one shown below buy a new one. A funny adapter can cause you more issues than save you money.
Its simple not worth it.
Dead battery
This is evident when the laptop doesn’t turn on if the battery is not connected to the charger but turns on if you connect to an external power source. If its the battery that’s dead, buy a new one for cheap on Amazon.
Just make sure before you buy a new battery, that the issue is really the battery, not that its simple drained and is empty.
Desktops
Some desktops have Power supply units (PSU) with an independent switch from the computer power button. These are usual located at the back of the CPU next to where you connect the power cord. If it’s switched off and you are not aware you can go crazy tear up you computer to no avail, then feel like an idiot when someone comes to fix it and they just switch on a single button and boom you computer is fixed!
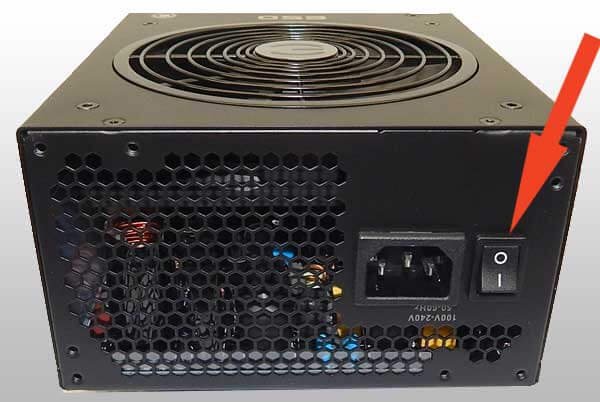
So check the back of the desktop to see if yours has the switch. Then if its off switch it on.
VGA Cables
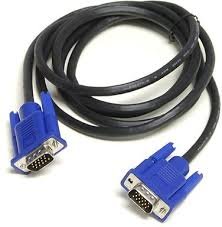
If the lights are on and fans spinning but nothing is displayed you might also want to check your Video Graphics Array (VGA) connector cable.
If you have another computer swap the cables with a known functioning one or even switch monitors to eliminate the monitor and connecting cable as the culprits.
Check if the screws are tightly screwed on both ends that is the VGA port and also on the monitor.
Most modern computers have more than one video output port. Check, if its a desktop whether it also supports DVI or HDMI Output. If so try those out put ports and see if anything gets displayed.
The same applies for Laptops if the screen is black try an external monitor using the HDMI cable.
Peripherals / Accessories preventing computer switching on.
Disconnect any hardware not required for the computer to boot. These may interfere with the computer turning on. These may include flash drives, cameras, dongles etc.
(Getting a bit paranoid) You cant be to carefully don’t forget to also check the DVD / CD Rom to see if anything is on them that can interrupt the booting process.
Reseat RAM
If there is a problem with your RAM stick your computer won’t boot. So you will need to change it, get a new RAM stick. The following are beep codes associated with RAM problems for different brands
RAM problems and their beep codes
| PC Brand | Beep |
|---|---|
| Asus | One continuous beep followed by two short beeps then a pause (repeated) |
| Dell | 2 beeps |
| Gigabyte | Memory error 1 long beep and 2 short beep |
| HP | 1 short beep and 1 long beep |
| Samsung (Phoenix BIOS) | One-three-four-one beep |
For other brands check on your PC manufacture’s website.
Note, your PC might have two Memory Ram sticks. Either your remove one of them and check if the computer turns on then if not, test the other stick. Or you could swap with one that you know is working properly.
On desktop its much easier to remove the ram stick once you open the CPU case cover.
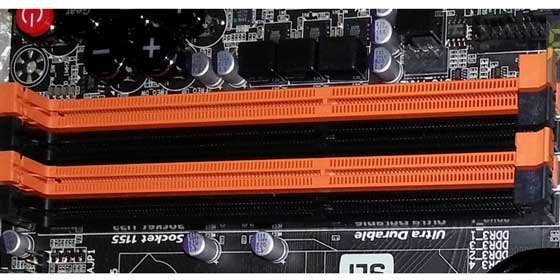
Carefully release the latches attaching the RAM to the motherboard, then holding the memory module lengthwise avoid static electricity from your body killing the ram. Static electricity as little as 10volts can damage your ram module.
NB: Quick tip, you can discharge your static from your body by simple touching the metal case of your computer and make sure you are not standing on the carpet and the computer is not on some fabric but a flat hard surface.
For laptops you will need to consult your manual since the internal setup varies with different models. Most models are designed in a way that its easy to swap and or add memory ram modules on your own.
At times simple reseating the memory modules may fix your computer and it successfully boots. While you there you can get rid of the dust that has collected there.
Real Time Clock (RTC) reset
For dell computers with non removable batteries you can do real time clock resets. The function is supported by number of models see table below. I Have included a full table at the bottom of this article
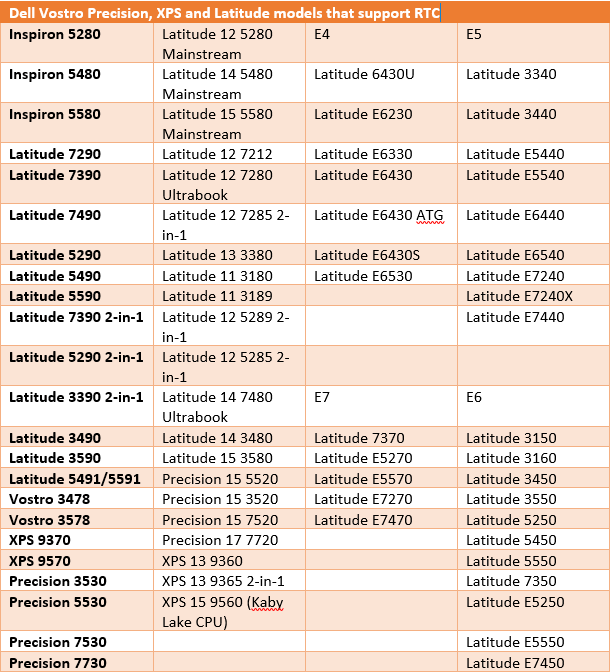
To do a real time clock reset press and hold the power button for exactly 30 seconds. After 30 seconds when you release the power button the RTC reset process is initiated.
Hopefully after it completes successfully your PC is fixed
Graphic card / or GPU
If the screen is blank fans spinning, lights are on, and the computer shows signs of life except on the monitor, chances are you have a faulty graphic card or its not configured properly.
Obviously the first check would be the cables as mentioned above on VGA cables section. Depending how you connect to your screening, check your VGA, DVI, HDMI cables. Then next step would be to reseat the graphic card for removable graphic cards.
New Graphic Cards
Switch off the machine and disconnect the power. Now carefully remove the graphic card from the PCI Express slot. Then put it back and make sure it seats firmly.
Now try rebooting the machine and see if you get a display.
If you just installed your new Nvidia graphic or Intel graphics and it now won’t switch on. Revert to the old on board card disable it at shutdown the machine put the new graphic card and see if it turns on. Don’t forget to swap the cables to the proper connections.
Also if you don’t remove the card, the motherboard will still try to display on that on the secondary card. Hence disconnect or disable it when testing.
Another option if you have the cables is to try different video output options for example switching from VGA, to HDMI that’s if your setup supports it.
Is the power supply enough to power on the graphic card? Low power can cause you graphic card to fail to display hence the machine not turning on. Use this tool here from coolermaster to check if your PSU can meet the demand for your graphic card otherwise that might be the reason why its not turning on. Then in that case you need to get a different power supply.
Incorrect / Faulty power supply
There are multiple ways to check if your power supply is working or not. Normally the fan on the power supply should start spinning as soon as you press the power button. That’s a sign it has power.
Another MacGyverish way would be to use a paper clip, if the PSU is removed from the computer. This helps make sure nothing else gets damaged as you test the PSU.
Basically you disconnect the PSU from the power supply, switch it off. Next locate the motherboard connector cable, the biggest cable from the Power Supply Unit. The bunch of cables that go to the motherboard are colored so locate the green wire from the bunch. Then stick the one end of the paper clip to where it connects to the motherboard and the other end on the adjacent black cable.
You can watch a video from here on the how you do it.
Important, even if you feel super MacGyverish don’t ever touch the paper clip when the PSU is on
This tricks the PSU into thinking the power button is switched on. Without touching the paper clip turn on the PSU. The fans should kick in if you PSU is in good shape.
Another important factor is the wattage of the power supply. If its too low then you will have issues with you computer turning on. Use the tool from coolermaster I linked to above to measure if your power supply is good enough to support a successful boot of your configuration.
Clear CMOS Battery
Information regarding your computer boot configuration and settings is kept on by the computer by the power of the CMOS battery. Its usually located near the video card but may differ on you computer. Its easy to spot though. See picture below.
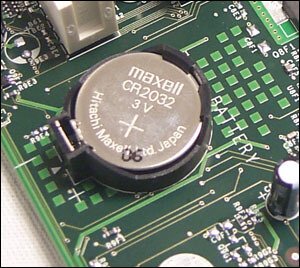
If you installed new hardware, its possible that previous settings might be preventing you computer from switching on. To clear the settings and previous configurations you can remove the CMOS battery.
To remove the CMOS battery
- Make sure computer is off.
- Disconnect from power supply.
- Remove the case cover.
- locate the CMOS battery.
- Pop the CMOS battery out.
- Wait for a couple of seconds 30+ would be ideal.
- Now insert the CMOS battery back.
All BIOS configuration should now have been reset to factory settings. Now close the case and connect to power. Test to see if the computer now boots.
Fans not spinning
When you press the power the computer does a quick self test of the various hardware on the machine. So whether its cold you should hear the fans kick in after you press the power.If they are not, there is a malfunction.
If the fans are not blowing then you computer will likely heat up and get it an on and off boot loop as it tries to prevent your hardware from getting fried and boot at the same time.Sometimes the fans will be blowing but making loud noises.
Most of the times this can be caused by a faulty power supply. But before we fully blame the power supply you can do a physical check if there is nothing physical blocking the fan.
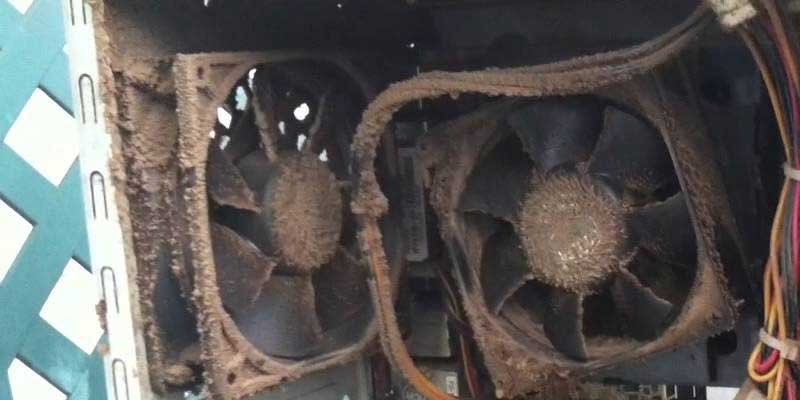
Open the case of the computer, its easier on desktop than laptops. On laptops you might need to consult the manual. After you are able to locate the fan, give it a light nudge and see if it spins. While you are here you can even blow it with a can of compressed air to clean up anything that might be blocking.
Note using blower is not recommended as it might cause the fan to spin to fast or break it.
If the fan still fails to blow check the power supply unit as mentioned above if its transferring and or getting any power.
If you have a broken fan, you can get a replacement from you computer manufacturer or order one on Amazon.
Monitor / Screens
Check if the monitor is connected properly on both the power cable and the video outlet otherwise you will have a blank screen. If you are using a docking station, multiple or secondary monitors check if they are configured properly.
On laptops you can switch displays by pressing a combination of keys, on dell Inspiron laptops its FN+ F1 keys, on Acer its Fn + F5 and most HP laptops use Fn + F4 key combination.
Motherboard problem
Is the motherboard receiving power. If the the lights on the laptop are blinking which means its receiving power. On a desktop computer you can even check by open the case, there should be green light the motherboard that comes on when the computer is plugged into the power supply unit.
If the motherboard is not receiving power you need to check the cables. The first cable to check would be the the ATX 6 pin power supply connector, depending on the model, some are even 24 pin. Basically its the biggest cable from the PSU to motherboard. Example image below.
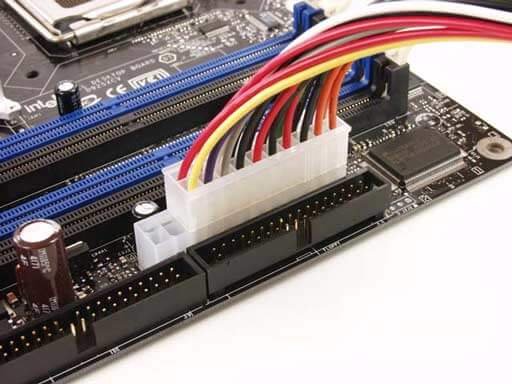
Now check if the cable is firmly attached to the motherboard, also check for any anomalies or deformities on the cable.
Short Circuit in motherboard prevents computer turning on.
If you check the internal setup of your computer, you will notice the motherboard is held a bit high above the computer case. This is to prevent short circuiting. If the motherboard comes into contact with other metal object it can short circuit, hence your computer fails to boot.
If you installed the motherboard yourself check if there is no contact with metal components and the metal case. Also check that all the cables are properly insulated, that there are no exposed, detached cables can cause short circuit.
Power button to motherboard connector
This is another important cable. If its not connected properly you will wonder why computer wont turn on even though the motherboard light is on and everything seems okay. Well its because there is no signal from the power button to the system. Unless you can MacGyver it by jumping it with the paper clip method then you will have a working dead computer.
Connecting the power button will definitely require a manual as the cables are not easily marked like the others. Get the manual by searching through the website of the manufacture’s website. Most PC websites like Dell and HP ask for the service tag that should help you locate the correct manual for your system.
If you cant find it on the manufacturer’s website you can go to the motherboard manufacturer’s website for example foxtron, phoenix, gigabyte etc.
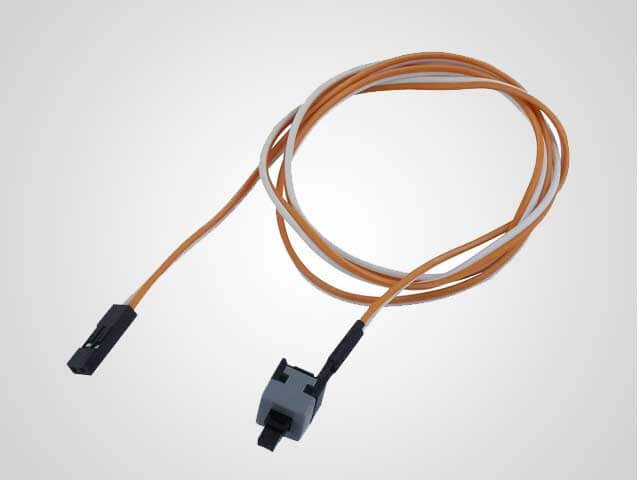
The cables may vary from model to model especially when it comes to laptops.
Nowadays most hardware is made compatible with most most motherboards. That doesn’t mean hardware conflicts have all been eliminated. Hardware conflict may cause your computer not to to turn on. In this instance you will have to test each hardware one by one. Starting with newly introduced hardware.
Motherboards are very delicate but if you have interest in building computers then you will to get used to wrangling them.
CPU Failure
This is the least likely reason for you computer failing to boot. Unless If you have a really old computer, then your CPU might start behaving funny. Unfortunately not all CPUs are replaceable. And if it is replaceable you are get assistance from the company that manufactured your computer.
Preferable though unlikely if its still under warranty you can send it back to have it replaced. The CPU fail for the following reasons.
- Age, everything has its lifespan
- Overheating, that’s the reason why fans start blaring when the computer starts heating up and also why air circulation is considered on designing the system.
- Overclocking your computer, this increase the strain on the CPU so do it when
- Power surges, lightning strikes etc. Never hurts to invest in a surge protector.
RTC Support on Dell Computers
| Dell Vostro Precision, XPS and Latitude, That support RTC | |||
| Inspiron 5280 | Latitude 12 5280 Mainstream | E4 | E5 |
| Inspiron 5480 | Latitude 14 5480 Mainstream | Latitude 6430U | Latitude 3340 |
| Inspiron 5580 | Latitude 15 5580 Mainstream | Latitude E6230 | Latitude 3440 |
| Latitude 7290 | Latitude 12 7212 | Latitude E6330 | Latitude E5440 |
| Latitude 7390 | Latitude 12 7280 Ultrabook | Latitude E6430 | Latitude E5540 |
| Latitude 7490 | Latitude 12 7285 2-in-1 | Latitude E6430 ATG | Latitude E6440 |
| Latitude 5290 | Latitude 13 3380 | Latitude E6430S | Latitude E6540 |
| Latitude 5490 | Latitude 11 3180 | Latitude E6530 | Latitude E7240 |
| Latitude 5590 | Latitude 11 3189 | Latitude E7240X | |
| Latitude 7390 2-in-1 | Latitude 12 5289 2-in-1 | Latitude E7440 | |
| Latitude 5290 2-in-1 | Latitude 12 5285 2-in-1 | ||
| Latitude 3390 2-in-1 | Latitude 14 7480 Ultrabook | E7 | E6 |
| Latitude 3490 | Latitude 14 3480 | Latitude 7370 | Latitude 3150 |
| Latitude 3590 | Latitude 15 3580 | Latitude E5270 | Latitude 3160 |
| Latitude 5491/5591 | Precision 15 5520 | Latitude E5570 | Latitude 3450 |
| Vostro 3478 | Precision 15 3520 | Latitude E7270 | Latitude 3550 |
| Vostro 3578 | Precision 15 7520 | Latitude E7470 | Latitude 5250 |
| XPS 9370 | Precision 17 7720 | Latitude 5450 | |
| XPS 9570 | XPS 13 9360 | Latitude 5550 | |
| Precision 3530 | XPS 13 9365 2-in-1 | Latitude 7350 | |
| Precision 5530 | XPS 15 9560 (Kaby Lake CPU) | Latitude E5250 | |
| Precision 7530 | Latitude E5550 | ||
| Precision 7730 | Latitude E7450 | ||
Conclusion
If your computer still wont turn on you will need to contact the help support for your system manufacturer.
As said above we will be continually updating this article from feedback from our users. Is there anything that we missed. Let us know in the comments section and we will add to the article.
Other Resources

My computer recently started to turn on but it never actually showed anything on the screen so I am trying to figure out what is wrong. I like your idea of getting a new graphics card because that seems to be the problem. I’ll keep your article in mind as I find a professional that can help me fix this problem.
Hopefully you get it fixed soon. Glad to help.
My son’s computer won’t turn on ever since we moved houses and I’m not sure what exactly is the reason. I tried doing some of the diagnostics you suggested and I have an inkling that the problem may be with the motherboard as it does not light up when we use it. I’ll be sure to take it to a computer repair shop and tell them about what I think the problem is. I feel really clueless handling this on my own and I’d like to have it fixed as soon as possible since my son needs it for his online classes so having experts fix it for me is my best option.
Thanks for sharing. I read many of your blog posts, cool, your blog is very good.
Your point of view caught my eye and was very interesting. Thanks. I have a question for you.
Your article helped me a lot, is there any more related content? Thanks!
Thanks for sharing. I read many of your blog posts, cool, your blog is very good.
Thank you, your article surprised me, there is such an excellent point of view. Thank you for sharing, I learned a lot.
Thank you, your article surprised me, there is such an excellent point of view. Thank you for sharing, I learned a lot.
I don’t think the title of your article matches the content lol. Just kidding, mainly because I had some doubts after reading the article.
I don’t think the title of your article matches the content lol. Just kidding, mainly because I had some doubts after reading the article.
Thank you for your sharing. I am worried that I lack creative ideas. It is your article that makes me full of hope. Thank you. But, I have a question, can you help me?
Can you be more specific about the content of your article? After reading it, I still have some doubts. Hope you can help me.
Your point of view caught my eye and was very interesting. Thanks. I have a question for you.
Can you be more specific about the content of your article? After reading it, I still have some doubts. Hope you can help me.
Can you be more specific about the content of your article? After reading it, I still have some doubts. Hope you can help me.
Your point of view caught my eye and was very interesting. Thanks. I have a question for you.